Just like the Windows operating system, the MacOS operating system has a hidden Library folder full of settings you shouldn’t really touch. Deleting some or all of these settings will at best force you to reinstall certain apps, and at worst, cause the whole system to collapse and require a complete reinstall.
- Show Hidden Files Mac
- How To Show Hidden Library Folder On Mac
- Show Library Folder Windows 10
- Show Hidden Library Folder Time Machine
- Show Hidden Library Folder Mac Sierra
But there may be times when accessing the Library folder is necessary. For example, many apps put backups in the Library folder and you may want to back up the backup. Or you might be customising your Mac, which will need access to certain library folders.
Here is how to get there and not cause your Mac to collapse in a cloud of dust in the process.
What Is The Library Folder On MacOS?
Dec 29, 2019 How to Show Hidden Files and Folders on a Mac - Showing Hidden Files Open Finder. Click Computer. Double-click your hard drive's icon. Press ⇧ Shift+⌘ Command+. This key combination will display any hidden folders in your Mac's hard drive. Press ⇧ Shift+⌘ Command+.
The library folder is the area of your MacOS computer where app settings are stored. When you install a program, a folder is created in the Library for all of the essential settings. This can be anything from plugins, preference files and log files.
It’s hidden because basically some people are just plain clumsy and quite often don’t know what they are deleting. It’s only when it’s too late when they realise that something they just deleted should have been kept.
Onedrive not syncing. Before going ahead with the steps to Access the Hidden Library Folder on your Mac, you need to be aware that /Library Folder contains important Data and Files related to Mac User Accounts. Hence, make sure that you are accessing the Library Folder for a good reason and you do know as to what you are trying to achieve. Dec 04, 2017 Or you might be customising your Mac, which will need access to certain library folders. Here is how to get there and not cause your Mac to collapse in a cloud of dust in the process. What Is The Library Folder On MacOS? The library folder is the area of. With the release of Mac OS X Lion way back in 2011, Apple removed easy access to the user’s Library folder. Although arguably well-intentioned, this change was frustrating for longtime Mac power. Your Mac also has its secret files to hide, which are usually the system data like the application support files, other access and preferences information, for example, the /Library folder. Those files or folders are hidden by default for Mac's smooth running, but in case you need to view them for examining or repairing, here we will offer you. Dec 29, 2019 How to Show Hidden Files and Folders on a Mac. This wikiHow teaches you how to view and unhide hidden files and folders on Mac OS X by using the Terminal app. If you don't have any hidden folders on your Mac, you can make one.
So you could say that Apple is protecting you against your own worst impulses!
How To Find The Hidden Library Folder On MacOS
There are two ways to get to the hidden Library folder if you are confident enough of not triggering a nuclear apocalypse. But the second way is only really feasible when you know where to look.
First Method (The Easiest)
Go to Finder and drop down the “Go” menu. You’ll see that the Library folder is not listed.
To make the Library folder appear, press the “Alt” key (also known as the Option key) at the bottom left of your keyboard. The Library folder will now appear.
Click on the Library folder option to be taken straight to the folder.
The problem though with this method is that this is very temporary. As soon as you take your finger off the alt key, the Library folder will disappear again. Mac show library folder sierra.
Second Method (Not Difficult)
Once you know the path to the folder (by following the previous method), you can then use the path to go directly to the Library folder.
At the top of the Library folder, you will see the exact path (location) of the folder on your computer.
I have covered over my username in the screenshot, but the path is :
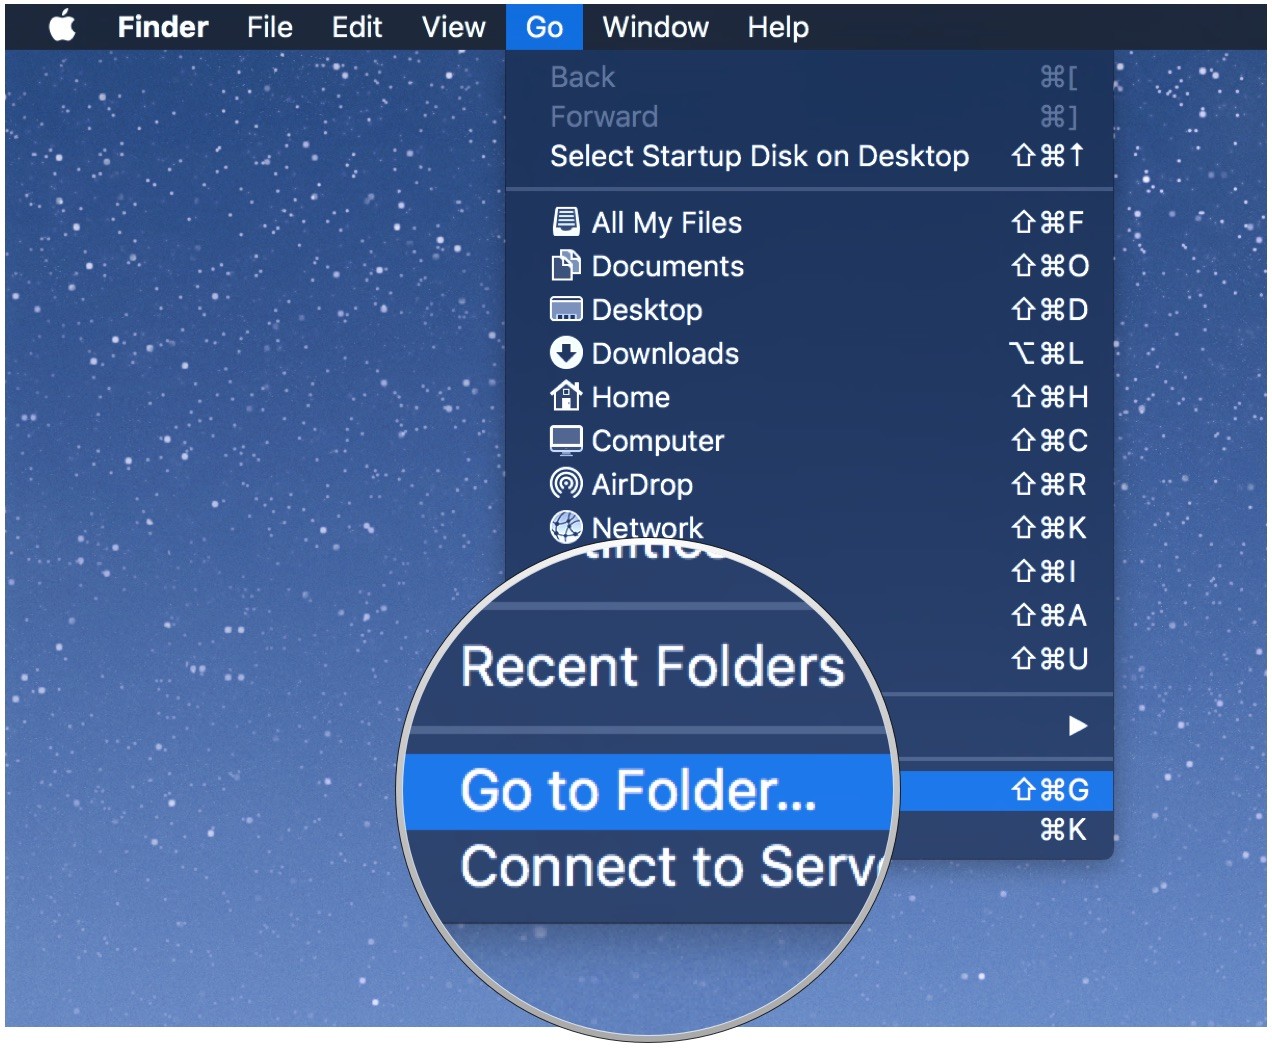
With that in mind, go back to Finder’s Go menu and at the bottom, you’ll see this option :
Choosing “Go to Folder” will bring up a box where you can type the path to the Library folder. Hitting the “enter” key will then take you straight there.
Even better, until you input the path to a different folder, the path to the Library will remain in the “Go to Folder” box.
When it is gone, dropping down the menu arrow on the right hand side will show you a list of previous folders you went to, and the Library one will be there too.
Conclusion
There used to be a way to keep the Library folder showing permanently. But as of High Sierra, the Terminal command no longer seems to work.
However, keeping the folder permanently visible isn’t a good idea since you might delete a system-critical file. Besides, as you have just seen, it is not difficult at all to go to the folder when you need it.
Your Mac has a secret. Thousands of them in fact, in the form of hidden files and folders lurking on its hard drive or SSD. Don’t worry, though. These files and folders are all supposed to be there. In fact, many of them are essential.
Many of these files are in your Mac’s main Library folder or in the ~/Library folder, which is in your User folder. Both these Library folders are hidden, but inside them are folders and files that hold things like preferences for apps.
In this article, we’ll tell you how you can view hidden files on your Mac and make your Library folder visible.
What are the hidden files on Mac?
The hidden files are a throwback to macOS’ Unix roots. In fact, the convention of naming them starting with a “.” comes from Unix. For that reason, you can’t use a “.” at the start of a regular file name, otherwise OS X will hide it.
The files themselves contain data like access rights and privileges for files and folders, application support files, and preferences.
There are a number of reasons files and folders are hidden. Mostly, though, it’s because they contain data critical to the smooth running of your Mac and that you shouldn’t interfere with. In addition, there’s no real reason for most users to see or access them. Also, if they were all visible, your Mac would look horribly cluttered.
How to view hidden files on Mac
Before you make your Mac show hidden files, it’s important to remember they’ve been hidden for a reason. The data they contain could cause havoc if you delete or alter it and don’t know what you’re doing.
If your goal in viewing, for example ~/Library is so you can manually delete application support files for a program you’ve uninstalled, consider using a dedicated uninstaller like CleanMyMac X. That will make it easy to remove all the files associated with an application with one click. You can download CleanMyMac X for free here.
CleanMyMac X will also allow you to get rid of all the hidden files you no longer need. Many of these files are created and used then not needed anymore. They just sit there clogging up your hard drive. CleanMyMac X scans your Mac, identifies this system junk and allows you to quickly and easily get rid of it, potentially several gigabytes of disk space.
If you still want to view hidden files on your Mac, you need to go to the Finder and do the following:
- Open a new Finder window and click on the name of your Mac under ‘Devices’ in the sidebar.
- Click on Macintosh HD, or whatever you’ve called your startup drive if you’ve renamed it.
- Press Command-Shift-. (period). You should now see lots of files and folders who’s name starts with “.” become visible.
- To re-hide the files and folders, hold down Command-Shift-. again.
How to view your Mac’s ~/Library folder
There are a couple of methods for making your ~/Library folder visible. Here’s the simplest:
- Click on the Finder in the Dock.
- Open a new Finder window and navigate to your user folder (Tip: if it’s not in the sidebar, go to the Finder menu, choose Preferences, click Sidebar and check the box next to your Home folder)
- Click on the Go menu.
- Hold down the Option (Alt) key.
- You should see that in the dropdown menu, Library appears below Home. Click on it.
Alternatively, do this to view your Library folder:
- Click on the Finder in the Dock.
- Click on the Go menu and choose Go to Folder.
- In the window that opens, type “~/Library”
With both these methods, your Library folder will disappear again when you close the Finder window. It’s easy enough to run through the steps above again to make it visible again when you need to, but if you want it permanently accessible, there are a couple of ways to do it.
The quickest is to drag the Library folder to the Finder’s sidebar. That will create a shortcut to it that will persist. If you want to keep ~/Library visible but don’t want it clogging up the sidebar in Finder windows, do this:
- Click on the Finder in the Dock.
- Click on the View menu and choose Show View Options.
- Check the box labelled Show Library Folder at the bottom of the window.
How to make macOS show hidden files using Terminal
If you’re feeling particularly adventurous, you can use the Terminal command line interface to view hidden files and folders. Here’s how to do it:
- Open Terminal from the Utilities folder in Applications, or by searching for it using Spotlight. You can also use the Go menu in the Finder to go directly to the Utilities folder.
- Type, or copy and paste, this command: defaults write com.apple.Finder AppleShowAllFiles true
- Press Return
- Type: killall Finder
Show Hidden Files Mac
To hide the files again, repeat the above steps, but replace ‘true’ with ‘false’ at the end of step 2.
How To Show Hidden Library Folder On Mac
How to hide any file or folder using Terminal
Now that you know how to view hidden files and folders on your Mac, you may be wondering how you can hide other files or folders, to keep them away from prying eyes. There are a number of third-party applications and utilities that offer to do this for you, but you can do it yourself in Terminal, like this:
- Launch Terminal.
- Type: chflags hidden
- Press the spacebar.
- Drag the file or folder you want to hide from the Finder onto the Terminal window.
- You’ll see the path to the file or folder displayed in Terminal after the command you typed.
- Hit Return to execute the command.
The file or folder you dragged onto the Terminal window will now be hidden. To see it again, use one of the methods described above to see hidden files.

Show Library Folder Windows 10
To make the file visible permanently again, use the steps above, but in step 2 type: chflags nohidden
As you can see, viewing hidden files and folders on your Mac is very straightforward. There are a number of ways to do it, and you can make them visible temporarily or permanently.
Show Hidden Library Folder Time Machine
However, just because you can view hidden files, doesn’t mean you should — the files are usually hidden because accidentally deleting them or altering them could cause chaos on your Mac. So, while it’s fine to have a peek, don’t do anything with the hidden files unless you know what you’re doing.
If you want to declutter your Mac or uninstall applications, use a dedicated application like CleanMyMac X. It will safely remove all useless files, add-ons, broken login items, caches, large and old files you didn't know about. Most likely, you won't even need to look for hidden files — CleanMyMac will do all the job for you.
We also showed that many of those files are stored in Library folders, including the one in your User folder, ~/Library. That folder is hidden by default, but you can view it or make it permanently visible using the techniques described above.
